The road to nirvana |
|
My journey into Photography, Horology, and Audiophilia |
Leveling the Cetus 3D MK3 3D printer
May 21, 2019
Leveling is a very basic but mandatory step in making successful prints. 3D printers have different ways of leveling, some manual, some automatic, but conceptually they're all the same. The Cetus 3D is no exception and easy to achieve.
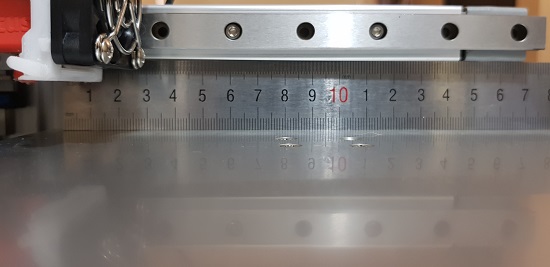
I hate compensation, therefore I excert effort in order to tram the build plate and Y-axis as close as possible. Using a steel ruler as a guide I make sure there's no gaps. Thankfully, the Cetus build plate has a firm platform where it is screwed upon, unlike the Ender 3 that use compensation screws and springs which complicate matters.

Removing the linear rail from the Y-axis will facilitate easier visual inspection and alignment. Secure the guide when alignment has been achieved. Once the linear rail is installed, I make a second visual inspection to check if everything is still ok.
With the mechanical part properly addressed, the next step is to set the nozzle offset from the build plate using UP Studio.
Begin by installing your favorite meterial on top of the build plate. I have a list of my favorite materials below.
- Set the Z-axis to 180 mm which in my Cetus, this will leave a big enough gap between the nozzle and the build plate.
- Click the [+] to move the nozzle closer to the build plate until it is about 0.2 mm close. I use visual or feeler gauge.
- Enter the current reading of the Z-axis into the Manual Setting textbox
- Click [Confirm] which will now set the nozzle distance and the Z-axis move up to confirm.
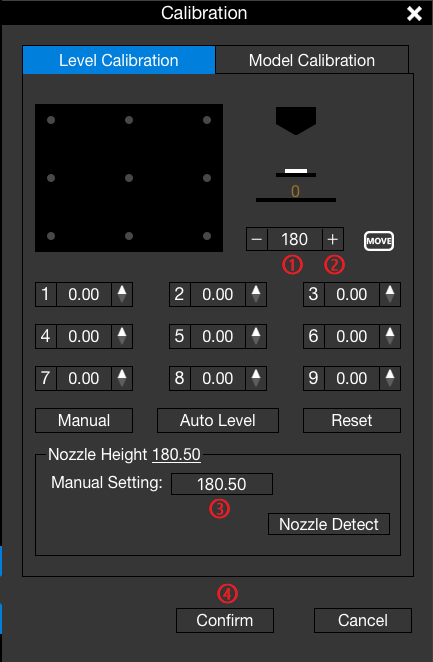
Once the nozzle distance is set, you can start a job with 0 offset for no raft, or use -0.5 offset if you'll be printing with a raft.
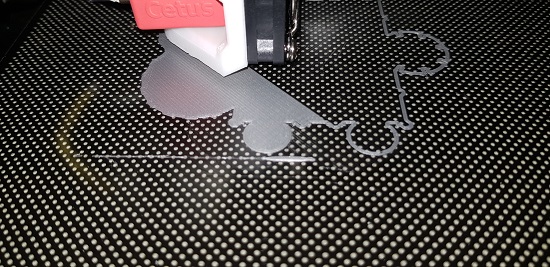
Here's a photo of the MKIII printing without a raft on the perforated board + PEI sheet.
Build plate materials that I use.
I've used these on top of both the stock non-heated build plate and the heated build plate.
- 3 mm glass sprayed with Gatsby hair spray
- 3 mm glass + 0.2 mm PEI sheet
- Cetus 3D perforated board + 0.2 mm PEI sheet