The road to nirvana |
|
My journey into Photography, Horology, and Audiophilia |
Working with Parameters in UP Studio 3
January 9, 2023
Many software store their configuration parameters in different means. In Windows we have the registry, which can be screwed up by an inexperienced person using RegEdit. Linux have configuration files scattered in different folders mainly inside /etc. Windows Store applications have their own protected space to store different configuration files. Having said that, UP Studio 3 is no different.
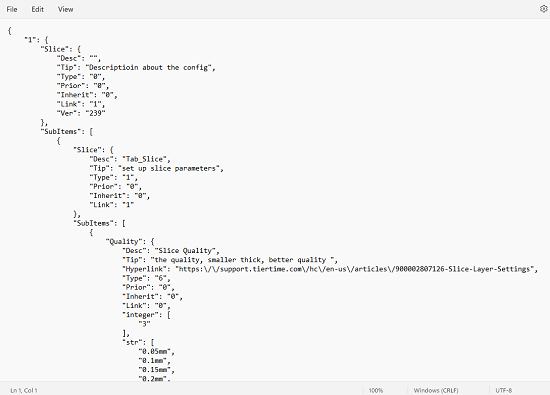
In UP Studio 3, the parameters that control if you make or break your prints are stored in a simple text files in JSON format. This collection of parameters and their values is called a configuration file. By the way, Tiertime refers to these configuration files as Print Profiles.
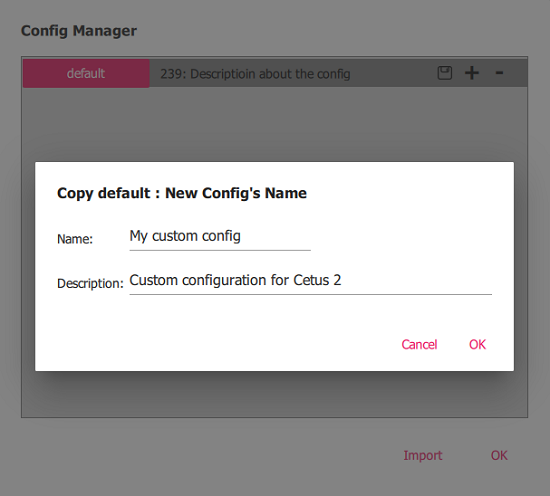
Config Manager
The purpose of the Config Manager is to load the presets for a specific printer, and there is a configuration called "default" which is loaded by UP Studio 3. You can create a new one by clicking the + icon and you can enter a Name and Description for your custom configuration.
When creating a custom configuration, the parameter values will be taken from "default" configuration file. You can also Import a .conf file that contain the parameters and their values.
You can save any configuration file by clicking the floppy disk symbol. Of course, you can also delete configuration files by clicking on the - symbol.
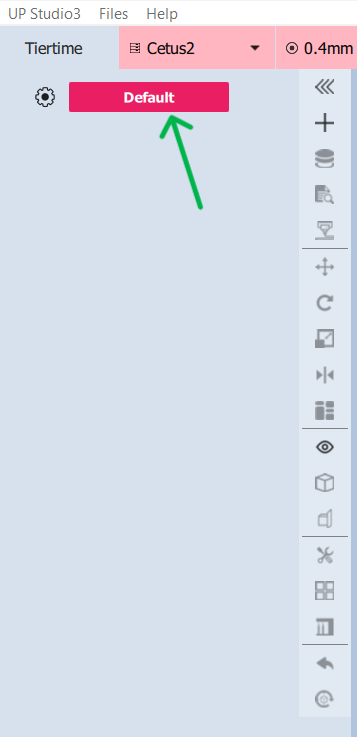
To activate the custom configuration, click the current one beside the gear icon. The Configuration Manager pop-up window will appear to let you choose your configuration.
Basic mode
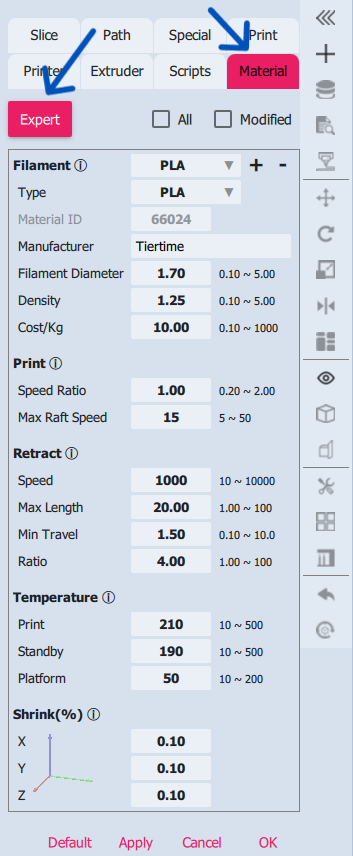
As installed, UP Studio 3 will only show the basic parameters hiding a wealth of other parameters which allows a more advanced way of controlling the prints. You can't go wrong in this Basic mode, it's even simpler than Cura.
Advanced and Expert modes
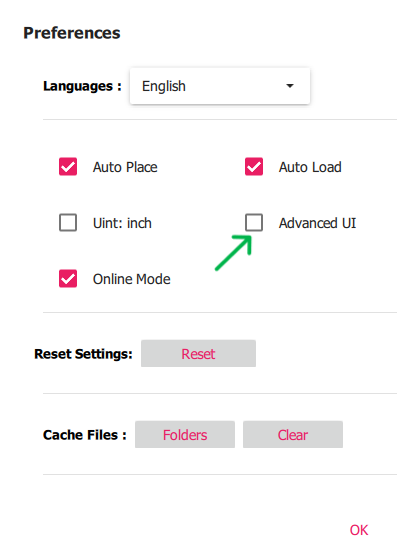
In order to reveal more parameters, we have to unlock it in UP Studio 3. In the Menu bar, click UP Studio3 then Preferences. The Preferences pop-up windows will apprear. Enable Advanced UI by clicking on the checkbox. Click OK, then restart UP Studio 3. Note: You may get away without a restart if the array of tabs already appears.
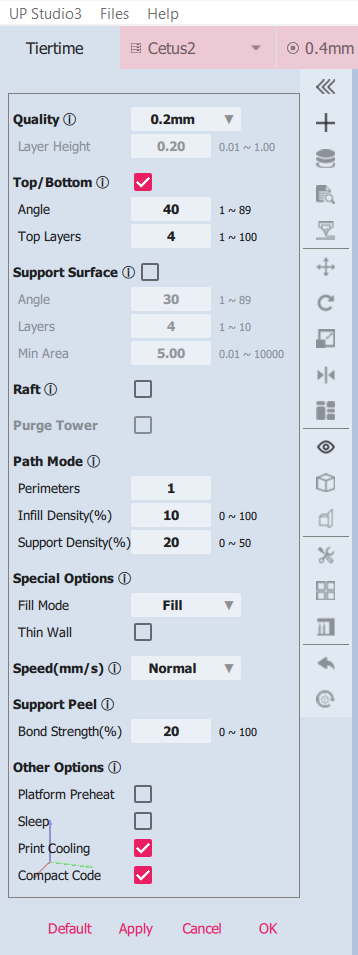
After completing the previous steps, you can now cycle between Basic, Advance, and Expert mode by clicking on the mode name. Here you will see a wealth of parameters that are now exposed to customize your print. In this mode you can even create your own custom filament profile.
Parameter hierarchy
When you load a model, a gear icon for the model will be visible. This is the "child" configuration from the "parent" configuration and they can either be linked or unlinked.
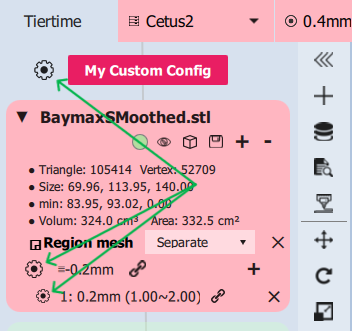
This is where UP Studio is excels, where every model and sub-model can have their own configuration for a more granular control of specific parameters. The parent config (My Custom Config in the photo) is the template for model and sub-model initial configurations.
The hierarchy is actually three levels. Main, model, and sub-model.
Pay attention to the link icons. When it's locked
 it
means that modified parameter values made to the lower levels
persist and are not affected by changes to the higher level. All
other unaltered parameter values follow the higher level hierarchy
values.
it
means that modified parameter values made to the lower levels
persist and are not affected by changes to the higher level. All
other unaltered parameter values follow the higher level hierarchy
values.
For example, Main Support Surface Angle default value is 30, therefore the Model inherits that value. When you change the Model Angle value to 40 then changes to the Main Angle value will no longer reflect to the Model Angle value.
If the link icon is unlocked
 *any* changes to parameter values in the upper hierarchy will not be
reflected to the lower hierarchy. It makes the current level
parameter values independent of the higher level parameter values.
*any* changes to parameter values in the upper hierarchy will not be
reflected to the lower hierarchy. It makes the current level
parameter values independent of the higher level parameter values.
This is where I'll end, as I don't think I need to discuss each and every parameter in the configuration. Tiertime already published a guide to all these parameters. Here's the official link https://support.tiertime.com/hc/en-us/sections/900000044383-UP-Studio-3
Make sure you click Apply and OK after making changes to the configuration for them to persist.