The road to nirvana |
|
My journey into Photography, Horology, and Audiophilia |
Printing on a budget using Epson Stylus T10
Wanting to see how my photos would look like in print, I try to find an opportunity whenever Epson is around, at malls or events, to have at least one of my photo printed.
I've seen the quality output Epson printers produces, such as from the TX400 or the compact PM250. After months of indecision, finally, I decided to get myself the Epson Stylus T10.
Why a cheap printer?
To begin with, I wanted the TX400 as it was my reference for gratis photo printing courtesy of Epson. However, the features of that model seems to be over-kill for my needs, as I don't need copy and scanning features. Most of my film shots are not that good to begin with. Well, maybe some of them can be salvaged, but what's left are few and apart.
The TX100 seems to be the next best thing, without the built-in card reader and LCD features of the TX400. It still has the scanner and copy features though. The lack of PictBridge (TX400 feature) and technical similarity with the lowest-end T10, convinced my wallet to give the T10 a try.
So I went out and got a T10, as well as a pack of 20 sheets of Epson Glossy Photo Paper.
Specifications
I will not repeat what the manufacturer said here.
First impressions
It's made of plastic, and I don't know how long this will last. So I hope it pays for itself before it breaks down. Having owned two cheap Canon "plastic printers", both S200SP, I know that with proper care, it should last a while.
It's well packed and critical areas have been secure using a tape that needs to be removed before use. It came with a reasonably long USB cable, a two-page instruction note, and installation CD.
Unpacking and assembly is straight forward, one should have it ready in no time at all, especially if you're the type who rips the plastic packaging that protects each component. It's just me, but I normally open these with care, and save every packaging nicely.
I run Windows Vista Business, and while the CD has no indication which Windows operating systems are supported, I made the assumption that it should support Vista. Besides, I cheated, as the flyers for the the T10 which I reviewed prior to purchase, indicates support for Vista.
Installing the software was such a breeze, with a pretty good user interface and very logical steps provided by it's installation program. I decided to install everything, so I can give them a try. You should not connect the USB cable to your computer unless the installation program tells you so. This allows all the Epson drivers to install properly and not be screwed by the hardware detection of Vista. Recognizing the T10 was just as easy, and the installation just zips along to completion.
Epson T10 software
The software provides quite a number of features. All of which are launched from the Epson File Manager. These include the Easy Photo Print, Attach to Email and Scan Assistant. These, together with the File Manager comprises the Epson Creativity Suite. An online manual is also provided, but such ease of use allowed me to skip reading it, and launched the File Manager.
The Epson File Manager allows you to browse photos stored on your computer, or devices such as Digital Camera, or Scanner. The icons for Easy Photo Print and Attach to Email are big enough so you would not miss it.
The Epson File Manager provides a tree-style folder navigator on the left pane and the main screen is the thumbnail viewer. From the viewer, it allows you to select photos for printing or launch a utility to edit the photos by applying Contrast, Lightness, Saturation, Red Eye Reduction as well as Image Rotation. From the Epson File Manager, you can also launch Easy Photo Print, and this is when it gets interesting.
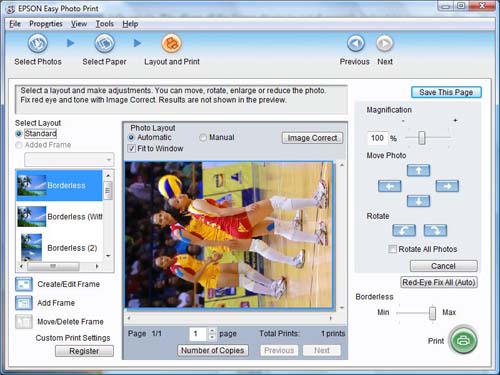
The Easy Photo Print allows you to select the Printer, Paper Size, Paper Source, Paper Type and Print Mode. I selected the print mode Best Photo for my first try. The next step allows you to select Layout and Print, and here you have a variety of options.
Layout options allow you to set Standard or Framed layout, among other things. So instead of typing the options here, I'll show you a screenshot.

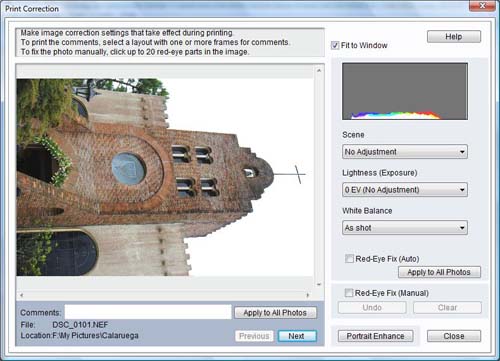
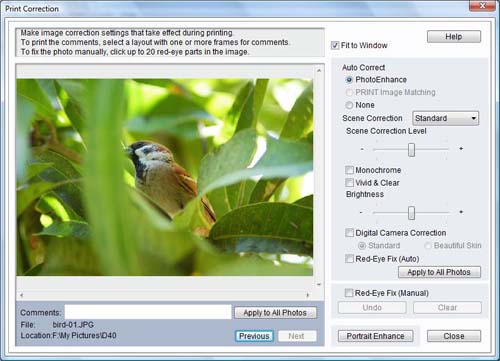
Now that's a lot of of things to play with. It gets more interesting when you click Image Correct. Depending on the type of image, RAW or JPEG, it shows you the following Print Correction options:
RAW options

JPEG options

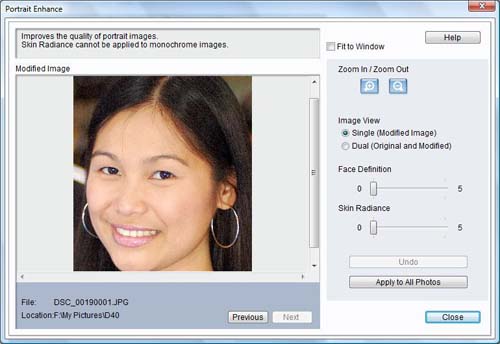
Portrait Enhance Options

I just love the flexibility provided by the software, having some sense of control on how the printing can be customized. Very nice indeed!
The results
I was stunned, to be honest. Although the sales people from Epson has informed me that I'll get nearly the same quality as the three times more expensive TX400, I gave it a doubt and prepared myself to accept a reduction in quality. I was wrong, they were right!
The output was so good I was grinning ear-to-ear as I pixel-peep my first photo printed by the T10. It takes some good 14 minutes of wait for an A4-sized, borderless photo to be spit out by the printer. But the wait is definitely worth it.
One thing to note though, the very first print it made showed some very fine band on the dark skies of a night shot I took. You have to look very close to notice them. Succeeding prints did not manifest it.
The verdict
Pros
- Cheap
- Great print quality
- Flexible software suite, including RAW support
- Reasonable build quality
- Did I say cheap?
Cons:
- No PictBridge or DPOF support
- No RAW support for D90 (not yet)